Growing (not only) trees. Part 1
Visualization is a great opportunity to see some complex structures from another side. Let’s assume we want to inspect how trees actually look. We will use Breadth-first search (BFS) to traverse graph (or tree in our case) and show connections between nodes.
def bfs(node)
  queue = [node]
  discovered = []
  while queue.length > 0 do
    current = queue.shift
    discovered << current
    current.children.each do |child|
      queue << child if child
    end
  end
  discovered
end
The awesome fact about BFS is that it traverse nodes from left to right, so, we will traverse tree level-by-level. Let’s assume we already have tree class. We start from filling a tree:
tree = Tree.new
[8, 4, 12, 2, 6, 10, 14, 1, 3, 5, 7, 9, 11, 13, 15].each do |value|
  tree.insert(value)
end
And now we will traverse all tree nodes and render it with left and right child:
([["Node", "Left", "Right"]] + bfs(tree.root).map do |node|
  [node.value, node.left&.value || "NULL", node.right&.value || "NULL"]
end).each { |n| puts n.join(" ") }
This code produces the following table (additionally I piped it through column -t):
Node  Left  Right
8     4     12
4     2     6
12    10    14
2     1     3
6     5     7
10    9     11
14    13    15
1     NULL  NULL
3     NULL  NULL
5     NULL  NULL
7     NULL  NULL
9     NULL  NULL
11    NULL  NULL
13    NULL  NULL
15    NULL  NULL
It’s time to draw a tree! We will use graphviz for rendering.
According to Graphviz documentation we need to simply describe edges in proper format and graphviz will render the graph. Sounds easy. We will generate .dot file and then render it. To reduce complexity of manipulating with files we will write output to stdout and then pipe it into the graphviz tool. It will look like:
ruby tree.rb | dot | neato -n -Tpng -o tree.png
Additionally, to decrease feedback loop (in case if you are using iTerm), you could use build-in command imgcat, so it will look like:
ruby tree.rb | dot | neato -n -Tpng | imgcat
This code will generate our first node graph:
def render_tree(tree)
  result = []
  result << "digraph graphname {"  # graph type
  result << "node [shape=circle];" # we want pretty circles as nodes

  bfs(tree).each do |node|
    node.children.each do |child|
      next if child.nil?
      result << [node.value, child.value].join(" -> ")
    end
  end

  result << "}"
  result.join("\n")
end
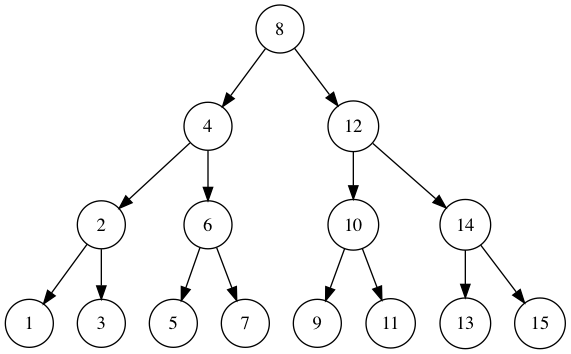
It will generate Graphviz file with the following content:
digraph graphname {
node [shape=circle];
8 -> 4
8 -> 12
4 -> 2
4 -> 6
12 -> 10
12 -> 14
2 -> 1
2 -> 3
6 -> 5
6 -> 7
10 -> 9
10 -> 11
14 -> 13
14 -> 15
}
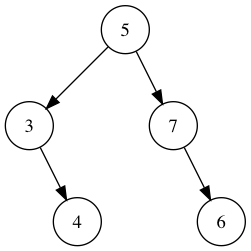
But there are some problems. Let’s assume we have more than one node with the same value ([5, 3, 7, 3, 7, 5]):
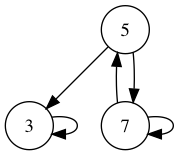
Hmm…, its not what we expect. We need more unique identificator and Ruby provides object_id method, which we can use to get unique identifier for each node.
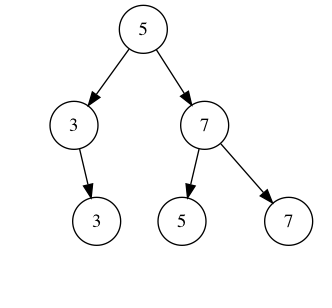
Ok, it’s better, but still not so good, we solved one problem but there is another one. Graphviz allows you to define how to render nodes. In order to do this, you need to append a line with label’s contents.
New code:
def render_tree(tree)
  result = []
  result << "digraph graphname {"
  result << "node [shape=circle];"

  bfs(tree).each do |node|
    result << "#{node.object_id} [label=#{node.value}]"
    node.children.each do |child|
      next if child.nil?
      result << [node.object_id, child.object_id].join(" -> ")
    end
  end

  result << "}"
  result.join("\n")
end
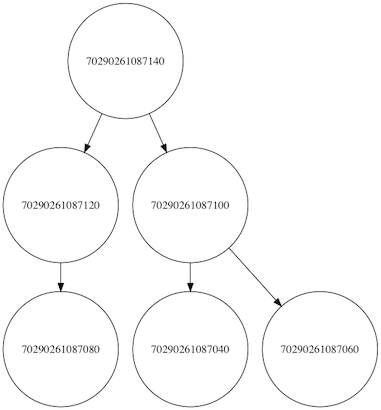
This is file generated by our method:
digraph graphname {
node [shape=circle];
70120168878200 [label=5]
70120168878200 -> 70120168878140
70120168878200 -> 70120168878120
70120168878140 [label=3]
70120168878140 -> 70120168878100
70120168878120 [label=7]
70120168878120 -> 70120168878000
70120168878120 -> 70120168878020
70120168878100 [label=3]
70120168878000 [label=5]
70120168878020 [label=7]
}
Result is:
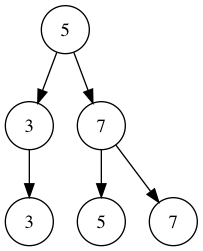
Ok, nice, but it’s not actually a binary tree. There is a nice answer on StackOverlow which gives you idea how to do render this tree as binary tree: https://stackoverflow.com/a/10905657.
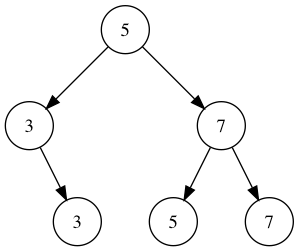
Yes! So nice, actually what we want. But…
Hay! Node with value 6 is on the right of node with value 7, maybe something wrong with our tree insertion code?
Node  Left  Right
5     3     7
3     NULL  4
7     6     NULL
4     NULL  NULL
6     NULL  NULL
Seems like not. We need to try something else and there is question on Graphviz site which should help us: http://www.graphviz.org/content/FaqBalanceTree. According to that we need to add invisible nodes to our tree. Additionally we need to add invisible nodes for nodes with just one leaf. To implement it we introduce new class InvisibleNode which we inherit from Node class.
class TreeRenderer
  InvisibleNode = Class.new(Node)

  def initialize(tree)
    @tree = tree
  end

  def call
    result = []
    result << "digraph graphname {"
    result << "node [shape=circle];"

    bfs(tree).each do |node|
      result << ["#{node.object_id}", %{[label=#{node.value} fixedsize=true]}].join(" ")
      fix_missing_children(node).each do |child|
        case child
          when InvisibleNode
            result << [child.object_id, %{[label="" width=.1 style=invis]}].join(" ")
            result << [[node.object_id, child.object_id].join(" -> "), '[style=invis]'].join(" ")
          when Node
            result << [[node.object_id, child.object_id].join(" -> ")].join
        end
      end
    end

    result << "}"
    result.join("\n")
  end

  private
  attr_reader :tree

  def fix_missing_children(node)
    node
      .children
      .map { |child| child || generate_fake_child(node) }
      .insert(1, generate_fake_child(node))
  end

  def generate_fake_child(node)
    InvisibleNode.new.tap { |child| child.parent = node }
  end
end
It’s not so cool now, because, actually, it’s complex. We could delegate nodes rendering to the Node class, but I think it’s not perfect idea to change actual “business-logic” code for rendering.
Additionally it will be nice to have ability to show NULL values, for debug purposes.
class TreeRenderer
  InvisibleNode = Class.new(Node)
  NilNode = Class.new(Node)

  def initialize(tree, with_nil)
    @tree = tree
    @with_nil = with_nil
  end

  def call
    result = []
    result << "digraph graphname {"
    result << "node [shape=circle];"

    bfs(tree).each do |node|
      result << ["#{node.object_id}", %{[label=#{node.value} fixedsize=true]}].join(" ")
      fix_missing_children(node).each do |child|
        case child
          when InvisibleNode
            result << [child.object_id, %{[label="" width=.1 style=invis]}].join(" ")
            result << [[node.object_id, child.object_id].join(" -> "), '[style=invis]'].join(" ")
          when NilNode
            result << [child.object_id, %{[label="NULL" shape="box" style="#{with_nil ? '' : 'invis'}"]}].join(" ")
            result << [[node.object_id, child.object_id].join(" -> "), %{[style="#{with_nil ? '' : 'invis'}"]}].join(" ")
          when Node
            result << [[node.object_id, child.object_id].join(" -> ")].join
        end
      end
    end

    result << "}"
    result.join("\n")
  end

  private
  attr_reader :tree, :with_nil

  def fix_missing_children(node)
    node
      .children
      .map { |child| child || generate_nil_child(node) }
      .insert(1, generate_fake_child(node))
  end

  def generate_nil_child(node)
    NilNode.new.tap { |child| child.parent = node }
  end

  def generate_fake_child(node)
    InvisibleNode.new.tap { |child| child.parent = node }
  end
end
And the result is:
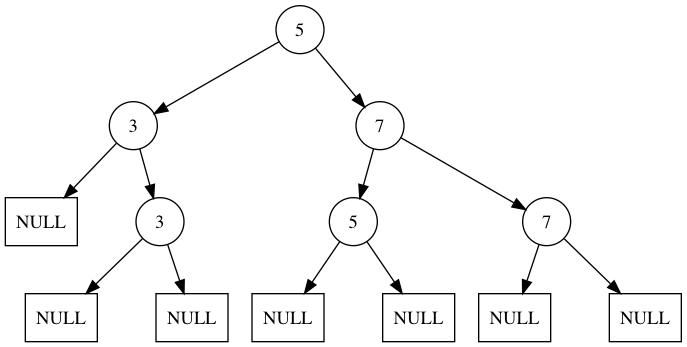
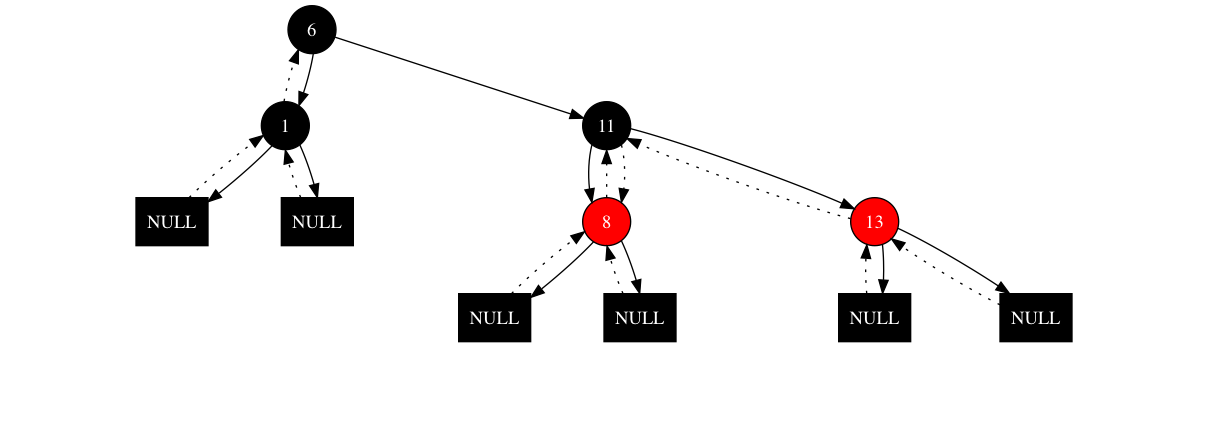
How can you use it? With minimal changes you can render any binary tree. For example here is RB-tree rendered this way.

I used this code to debug my RB-tree implementation. There are dotted edges which represents child-parent connection. So, I think you can easily find what’s wrong here.
Is it useful per se? Seems no, RB-tree implementation isn’t common task for average developer. In the second part we will discuss how to use this knowledge in real life world.